Purpose
Exchange Server natively lacks the capability to enforce sender-based routing through Send Connectors or Transport Rules. The RouteBySender application addresses this limitation by enabling outbound routing decisions based on the following criteria:
- Sender membership: Routing is determined by whether the sender is a member of a specified security or distribution group.
- Domain combinations: Routing logic is defined using relationships between sender and recipient domains.
- Message size: Routing behavior is conditioned on email size thresholds.
- Subject line content: Routing rules are triggered by keyword matches within the subject line.
Typical usage scenario
Consider an Exchange organization configured with a single Send Connector named "Internet Connector", using DNS routing for the * address space. Under this configuration, all outbound messages are routed through this connector by default.
RouteBySender introduces the ability to selectively reroute messages—for example, those originating from members of the Finance group—through a designated smart host rather than relying on DNS resolution.
Primary use cases
This utility is particularly suited for the following scenarios:
- Environments that require secure outbound email delivery via a dedicated smart host.
- Deployments that must adhere to strict routing policies, such as those mandated by Government Connect or similar frameworks.
Implementation
RouteBySender is implemented as a transport agent for Exchange Server, operating at the transport layer to intercept and evaluate outbound messages before final routing decisions are applied.
Current version: 1.0.0.38
Installation
Prerequisites and Environment Preparation
On the Exchange Mailbox server:
- Service account selection: Identify or create a user account that is a member of the following local and domain-level security groups:
- Local Administrators
- Domain Admins
- Domain Users
- Session context: Establish a local interactive logon session using the designated account.
File Deployment
- Create application directory: Create the target directory:
C:\Program Files\IvaSoft\RouteBySender
- Download installation package RouteBySender-Demo.zip to the above directory.
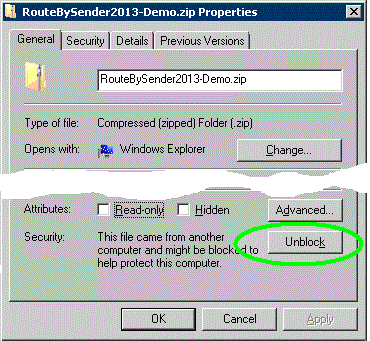
- Remove NTFS alternate data stream (ADS): Right-click the ZIP file, select Properties, and click Unblock (if present) to remove the zone identifier and prevent execution restrictions.
- Extract archive: Extract all files to the same directory.
Transport Agent Registration
- Run installer: Execute
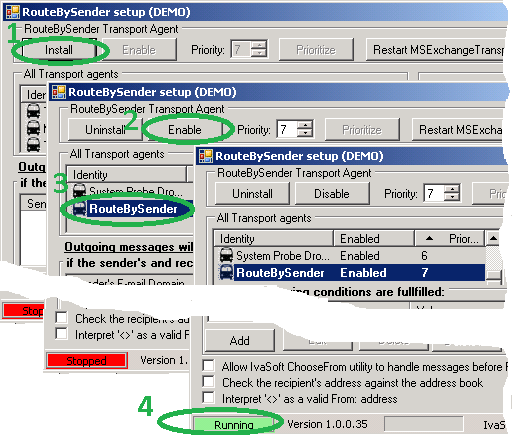
RouteBySenderSetup.exeand click Install [1]. - Verify transport agent registration: Confirm that RouteBySender appears in the All Transport Agents list [2].
- Enable transport agent: Click Enable [3] and verify that the status changes to Running [4].
Send Connector Configuration
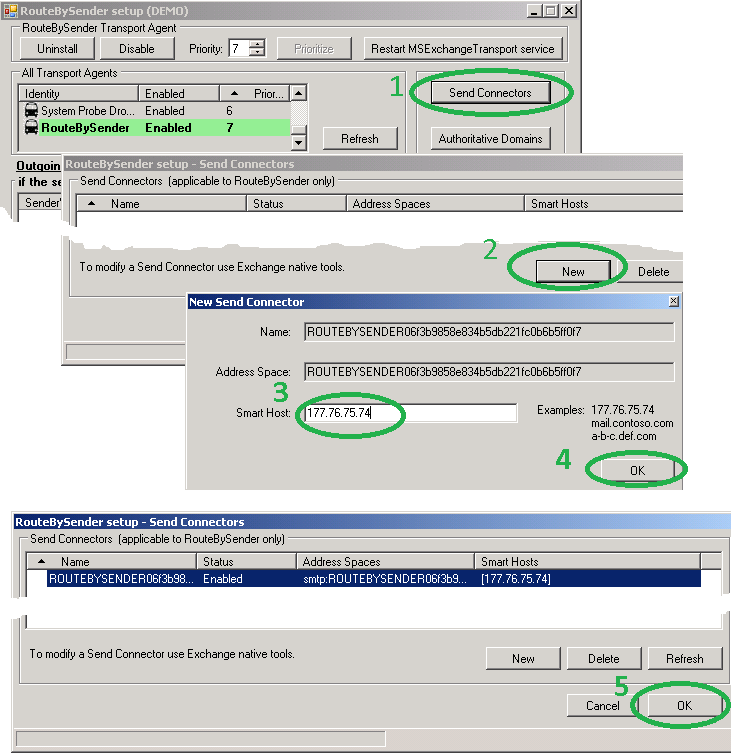
- Create dedicated Send Connector: Navigate to Send Connectors [1] and click New [2].
- Configure smart host target: In the New Send Connector window, specify the target smart host using either its IP address or fully qualified domain name (FQDN) [3].
- Finalize connector creation: Click OK [4] and confirm the new connector appears in the list [5].
Post-Installation Configuration (Optional)
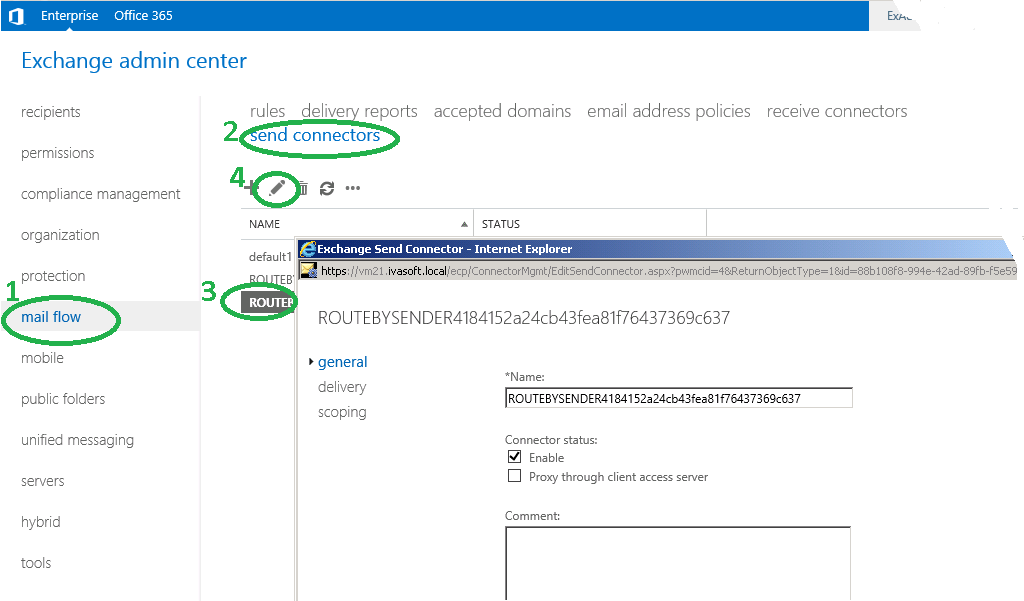
- Connector customization: Use the Exchange Admin Center (EAC) under Mail Flow > Send Connectors to modify advanced settings, including:
- Authentication methods
- Source server binding
- Important implementation note: Do not modify or remove the predefined address space (e.g.,
*.ROUTEBYSENDER{GUID}). This address space is used internally by the transport agent for rule matching and routing logic.
Testing
This section validates the RouteBySender transport agent using two test scenarios: domain‑based routing and group membership‑based routing.
jdoe@domain.com.
Scenario 1: Domain‑Based Routing Rule
- Launch configuration tool: Execute
RouteBySenderSetup.exe. - Add new rule: Click the Add button [1] to open the RouteBySender setup – Add New rule window.
- Define sender domain condition: In the field labeled "If Sender's E-mail domain is:", enter
domain.com. Select the radio button labeled "is any domain" [2]. - Select target Send Connector: Click the Browse button [3] to open the RouteBySender setup – Send Connectors dialog. From the list, select the connector named
ROUTEBYSENDER{GUID}(where{GUID}is the unique identifier assigned during installation). Click OK to close the dialog. - Verify connector assignment: Confirm that the first field in the "Use this Send Connector" frame is populated with
ROUTEBYSENDER{GUID}[4]. - Save rule: Click OK to save the changes [5].

- Send test message: Open Outlook and compose a new email to any external address (e.g.,
recipient@external.com). Send the message. - Validate routing: Verify that the message was routed through the smart host associated with the
ROUTEBYSENDER{GUID}Send Connector. (Check the message headers or smart host logs as appropriate for your environment.)
Scenario 2: Group Membership‑Based Routing Rule
- Create a distribution group: Open the Exchange Admin Center (EAC) and navigate to Recipients > Groups. Click New + > Distribution group. In the Display name field, enter
testroutebysendergroup. Complete the creation wizard and add your user account as a member of this group. - Reset configuration: Launch
RouteBySenderSetup.exe. In the second frame (domain rules), click the Delete All button [1] to clear any existing domain‑based rules. - Add group‑based rule: In the third frame (group rules), click the Add button [2] to open the RouteBySender setup – Add New rule window.
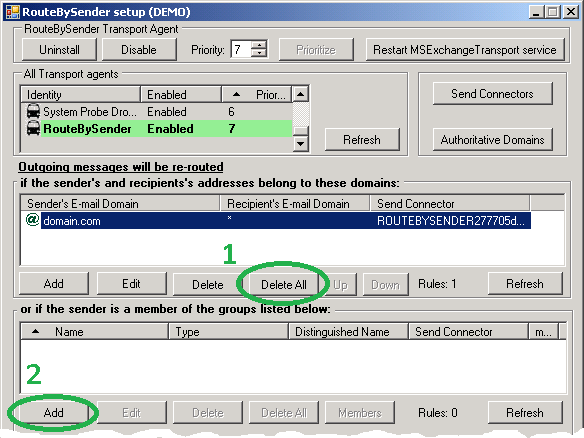
- Select source group: In the "If sender is a member of this group:" frame, click the Browse button [1] to open the RouteBySender setup – Add groups dialog. Select
testroutebysendergroupfrom the list. Optionally, click the Members button to confirm that your user account is a member. Click OK to close the dialog. - Verify group selection: Confirm that the one‑row table in the first frame (group rules) is now populated with
testroutebysendergroupdata [2]. - Assign Send Connector: In the "Use this Send Connector:" frame, click the Browse button [3] to open the RouteBySender setup – Send Connectors dialog. Select
ROUTEBYSENDER{GUID}and click OK. - Verify connector assignment: Ensure that the topmost field in the "Use this Send Connector" frame shows
ROUTEBYSENDER{GUID}[4]. - Save rule: Click OK to save the changes [5].

- Send test messages: Using Outlook, compose and send several test emails from your account (which is a member of
testroutebysendergroup) to various external recipients. - Validate group‑based routing: Confirm that each message is routed through the smart host associated with
ROUTEBYSENDER{GUID}rather than the default Internet connector. Inspect message headers, smart host logs, or Exchange message tracking as needed.
Uninstallation
- Run RouteBySenderSetup.exe > Uninstall.
- Confirm the agent is removed from the Transport Agents list.
Demo Version Notes
The demo version appends [RouteBySender DEMO] to the subject line of each rerouted message; the full version does not.
FAQ
Q. The Transport service crashes with errors 1052 and 16023 after enabling the agent.
A. Grant Read permissions to the Network Service account in the RouteBySender installation directory.
Q. Are updates free?
A. Registered users receive free updates for one year after purchase.
Pricing and Licensing
Payments are processed by PayPro Global and BMT Micro. PayPro Global Customer Support BMT Micro Customer Support

An Enterprise license covers all computers across a single organization worldwide, including all branches and remote users.
Affiliate Program
Earn a commission on every sale you refer through the PayPro Global affiliate network.
- Register as an IvaSoft affiliate in PayPro Global Affiliate System.
- Review the IvaSoft affiliate campaign details, including enrolled products and target markets.
- Wait for approval from IvaSoft to activate your affiliate agreement.
- Download the promotional materials and referral link from your affiliate agreement.
- Place a banner ad or contextual link on your website or blog.
- Receive monthly payouts as outlined in your affiliate agreement.