Purpose
Exchange Server natively lacks the ability to configure sender-based routing via Send Connectors or Transport Rules. The RouteBySender application enables outbound email routing based on:
- Sender membership: Route emails based on whether the sender is a member of a specified group.
- Domain combinations: Define rules using sender/recipient domain relationships.
- Message size: Apply routing based on email size thresholds.
- Subject line content: Filter emails using keywords in the subject line.
Typical usage scenario
Assume your Exchange organization uses a single Send Connector named "Internet Connector" (configured with DNS for the * address space). All outbound emails use this connector by default. RouteBySender allows you to reroute emails from specific groups (e.g., members of the Finance team) through a smart host instead of DNS.
This utility is ideal for:
- Organizations requiring secure email delivery via a dedicated smart host.
- Compliance with strict routing policies (e.g., Government Connect).
Application Type
Transport Agent for Exchange Server.
Current version: 1.0.0.38
Installation
On the Exchange Mailbox server:
- Create or select a user account with Local Administrators, Domain Admins, and Domain Users permissions.
- Log in locally with this account.
- Create the directory: C:\Program Files\IvaSoft\RouteBySender
- Download RouteBySender-Demo.zip to this directory.
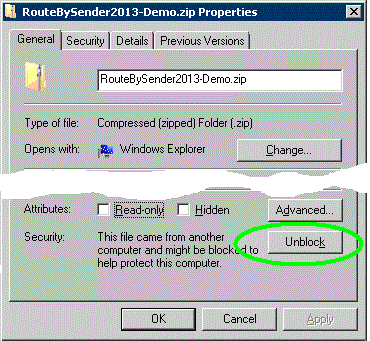
- Right-click the ZIP file, select Properties, and click Unblock (if available).
- Extract all files to the directory.
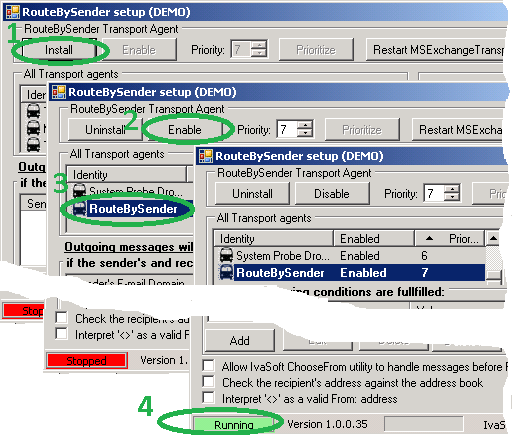
- Run RouteBySenderSetup.exe and click Install [1]. Verify that RouteBySender appears in the All Transport Agents list [2]. Click Enable [3] and verify the status shows Running [4].
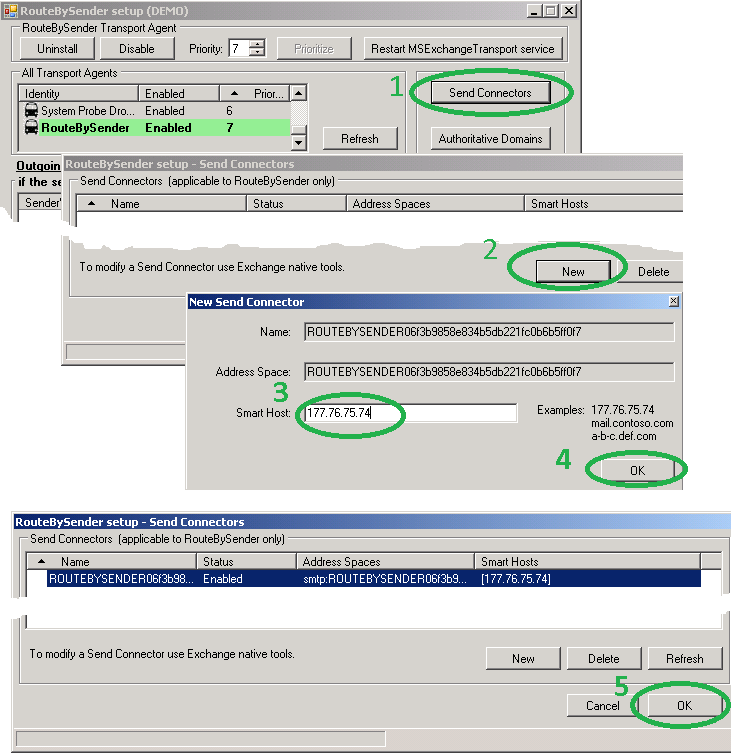
- Click Send Connectors [1] > New [2].
In the New Send Connector window:
- Enter the smart host’s IP or FQDN [3].
- Click OK [4] and confirm the connector appears in the list [5].
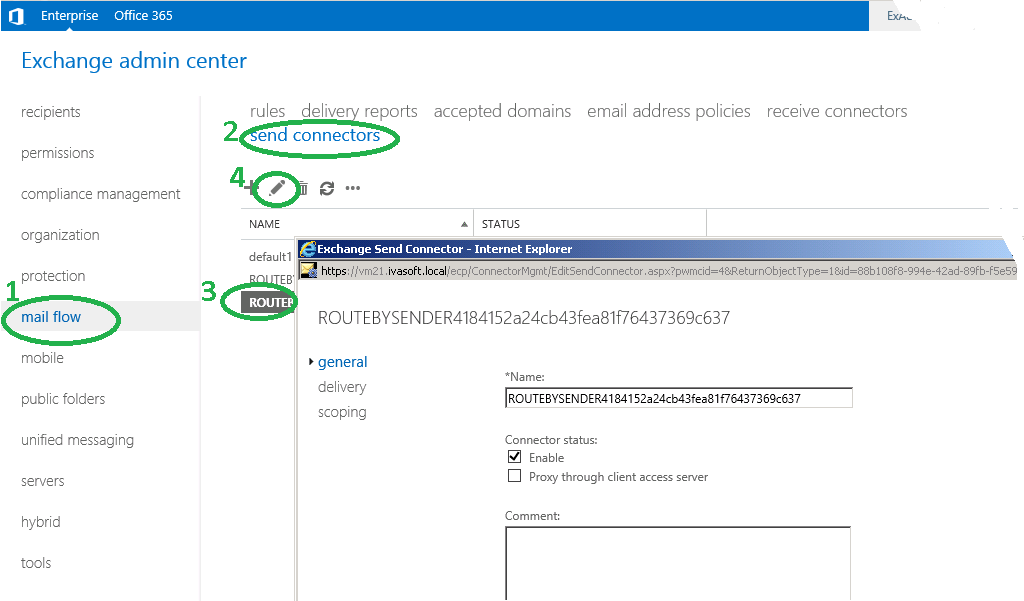
- Optional:
- Edit the connector in Exchange Admin Center (Mail Flow > Send Connectors) to adjust authentication or source servers.
Important: Do not modify the predefined address space (e.g., *.ROUTEBYSENDER{GUID}).
- Test the connector.
Testing
For this example, assume your default SMTP address is jdoe@domain.com.
-
Run RouteBySenderSetup.exe. Click "Add" button [1]. "RouteBySender setup - Add New rule" window will open. Enter domain.com in "If Sender's E-mail domain is:" field and select "is any domain" radio button [2]. Click Browse button [3]. "RouteBySender setup - Send Connectors" will open. Select "ROUTEBYSENDER{GUID}" from the "Send Connectors" list. Click OK to close the window. Make sure that the first field in "Use this Send Connector" frame is populated with ROUTEBYSENDER{GUID} [4].
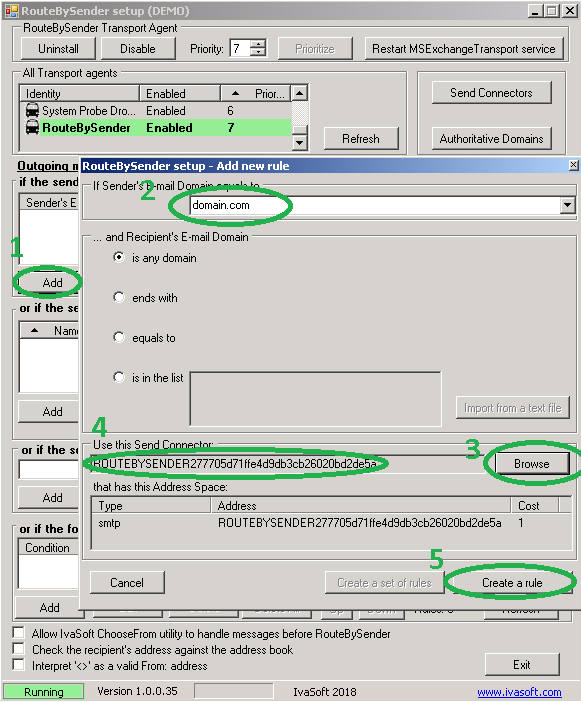
Click OK to save changes [5].
-
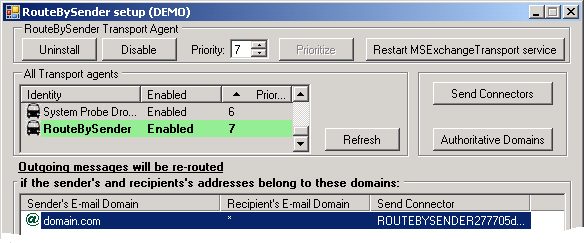
Open Outlook and create a new e-mail message to any external address. Send this message. Make sure that the message is routed to the smart host associated with ROUTEBYSENDER{GUID} Send Connector.
- Run the Exchange Admin Center (EAC) and navigate to Recipients > Groups. Click New + > Distribution group. Place testroutebysendergroup in the Display name field. Add yourself to this group.
-
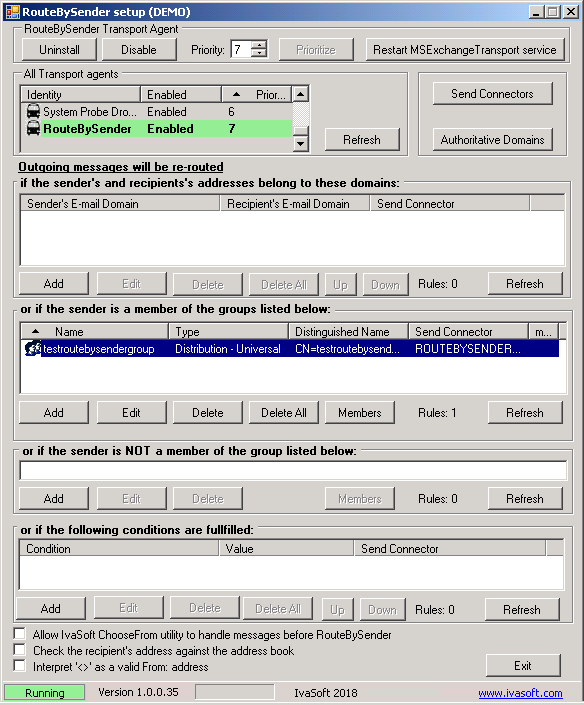
Run RouteBySenderSetup.exe and clear all items in the second frame by clicking the "Delete All" button [1]. Click "Add" button in the third frame [2].
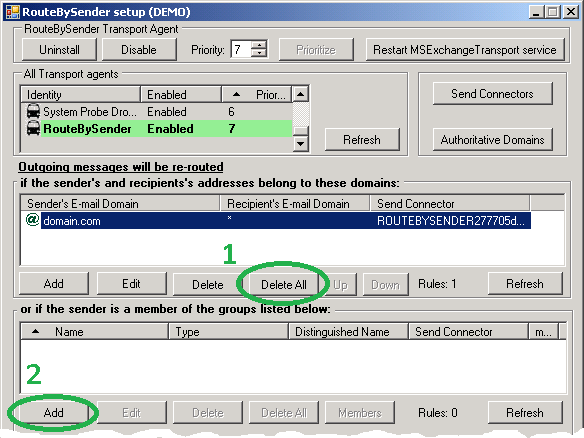
"RouteBySender setup - Add New rule" window will open. Click Browse button in "If sender is a member of this group:" frame [1]. "RouteBySender setup - Add groups" will open. Select testroutebysendergroup from the list. Make sure you are a member of this group by clicking Members button. Click OK to close the window. Make sure that the one-row table in the first frame is now populated with testroutebysendergroup data [2]. Now click Browse button in "Use this Send Connector:" frame [3]. "RouteBySender setup - Send Connectors" will open. Select ROUTEBYSENDER{GUID} from the "Send Connectors" list. Click OK to close the window. Make sure that the topmost field in "Use this Send Connector" frame is populated with ROUTEBYSENDER{GUID} [4].
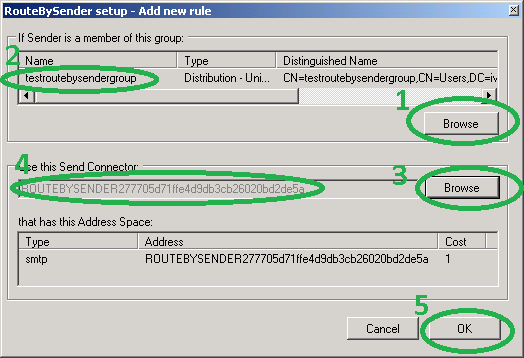
Click OK to save changes [5].
-
Send test emails from Outlook to external addresses and confirm delivery via the smart host.
Uninstallation
- Run RouteBySenderSetup.exe > Uninstall.
- Confirm the agent is removed from the Transport Agents list.
Demo Version Notes
- Adds [RouteBySender DEMO] to rerouted emails’ subject lines.
FAQ
Q. The Transport service crashes with errors 1052 and 16023 after enabling the agent.
A. Grant Read permissions to the Network Service account on the RouteBySender installation directory.
Q. Are updates free?
A. Registered users receive free updates for one year following purchase.
Pricing & Licensing
Licensing policy: The product is licensed on a per Exchange Server basis.
All transactions are securely processed by our payment providers.
License type
Price per unit
Enterprise license (including the source code)
$7000.00
- A Site license covers a single organization within a single physical location. You may use the program on an unlimited number of computers within this area.
- An Enterprise license covers all computers in a single organization worldwide. If your company has multiple branches or thousands of machines, the Enterprise license covers them all.
Affiliate Program
Earn a commission on every sale you refer through the PayPro Global affiliate network.
- Register as an IvaSoft affiliate in PayPro Global Affiliate System
- Review IvaSoft affiliate campaign details (enrolled products and markets).
- Await approval from IvaSoft to activate your affiliate agreement.
- Download the product media and referral link provided in your Affiliation Agreement.
- Place a display ad (banner) or a contextual promo on your website or blog.
- Get monthly payouts according to your affiliation agreement.
